Simple site deploy from Git
A long time ago I used to upload sites to the internet via an FTP client. Then internet became faster and cheaper and I started to edit pages inside FTP client because necessity of uploading files after every edit was very frustrating.
Today all my sites are in Git repositories on GitHub or Bitbucket, so I can easily deploy sites from Git: make changes, commit them, type a command, and a minute later my users see new version on my site.
I use my very own shell script shipit: it’s a simple tool to run shell commands on a remote server via SSH. I used to use Fabric but shipit is much simpler and more convenient.
Authentication setup
First you need to set up SSH keys to be able to log in to your server without typing a password.
SSH key creation
You can read how to make an SSH key in GitHub or Bitbucket help. You need to do it on your local computer and on your hosting to make possible connection of your hosting with GitHub or Bitbucket.
Connection alias creation
You can save another few keystrokes by adding an SSH alias which you will use instead of host/login combination. Add this lines to your ~/.ssh/config file:
Host myhost
  HostName 113.113.13.13
  User tema
  IdentityFile ~/.ssh/id_rsa
Use your own host, login and key which you made on a previous step.
SSH key uploading
Upload SSH key to your hosting:
ssh myhost 'mkdir -p .ssh && cat >> ~/.ssh/authorized_keys' < ~/.ssh/id_rsa.pubNow you can open SSH connection with your hosting by typing just that:
ssh myhostProject preparation
I use Grunt to build my projects. If you don’t you can skip this section.
There are two ways to build and deploy sites:
- Commit built files and deploy with simple
git pull. - Commit only source code and build on deploy.
I usually use the latter. It makes repository more tidy and diffs cleaner. But one have to setup site building on a server. However it’s not a problem with Grunt.
I have a deploy task in my Gruntfiles which does everything except image optimization, testing and other long running processes that aren’t necessary to build a site.
grunt.registerTask('default', [
  'jshint',
  'concat',
  'stylus',
  'imagemin'
]);
grunt.registerTask('deploy', ['concat', 'stylus']);
I always install Grunt plugins with an npm’s --save-dev switch to make npm save package names and their versions to package.json. It should look like this:
{
  "name": "example",
  "version": "0.0.0",
  "private": true,
  "devDependencies": {
    "grunt": "~0.4.2",
    "load-grunt-tasks": "~0.2.0",
    "grunt-contrib-jshint": "~0.7.2",
    "grunt-contrib-concat": "~0.3.0",
    "grunt-contrib-stylus": "~0.11.0",
    "grunt-contrib-imagemin": "~0.4.0"
  }
}
Thus I can be sure that build willn’t break if a wrong version of some plugin is installed on a server.
Repository preparation
Link our local Git repository with a remote one and push it:
git remote add origin git@github.com:sapegin/example.git
git push -u origin master
Clone repository onto a hosting
ssh myhost
git clone git@github.com:sapegin/example.git ~/sites/example.com
logout
It shouldn’t ask you any passwords.
Shipit installation
Use this one-liner to install shipit:
pathtoshipit=/usr/local/bin/shipit; curl -o $pathtoshipit https://raw.github.com/sapegin/shipit/master/bin/shipit; chmod +x $pathtoshipit; unset pathtoshipitDeploy setup
My typical deploy script looks like this:
git checkout master
git pull
npm install
node -e "require('grunt').cli()" _ deploy
It means:
- Switch to
masterbranch (just in case). - Get recent changes from GitHub/Bitbucket.
- Install/update npm packages.
- Build site using Grunt.
In the latter step I run deploy task in a locally installed (npm install without -g switch) Grunt. In that case all deploy dependencies can be installed with a single command: npm install and don’t require sudo.
Make a shipit script:
host='myhost'
path='sites/example.com'

[deploy]
git checkout master
git pull
npm install
node -e "require('grunt').cli()" _ deploy
And save it as .shipit in a project root folder.
Shipit connects to a server via SSH, goes to a project folder and runs all commands contained after [deploy] line. (In fact it’s much more flexible.)
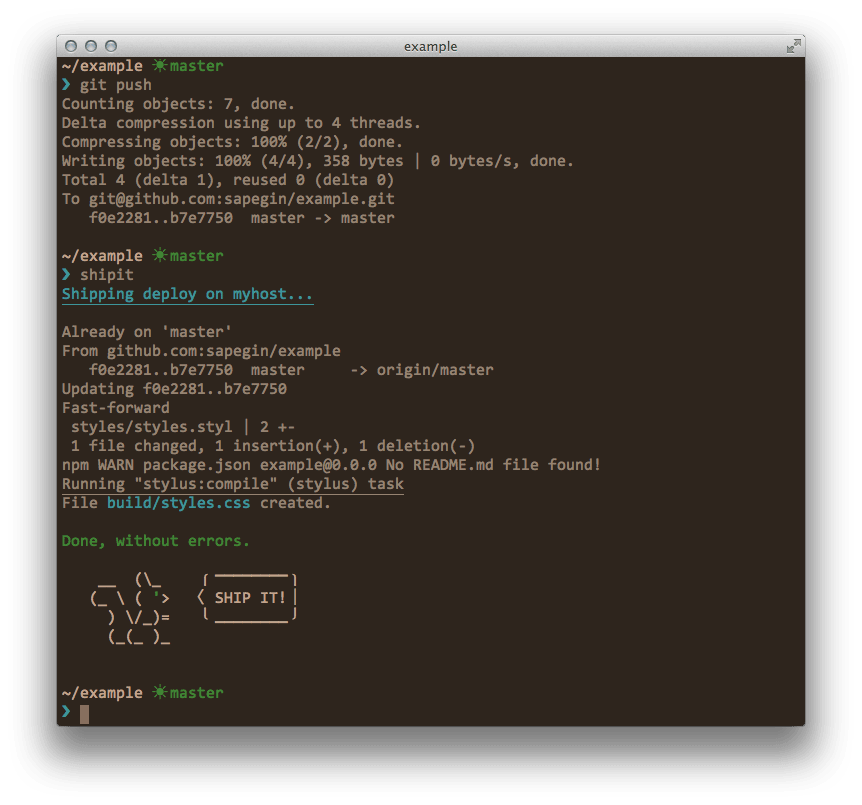
That’s all, now deploy is as easy as this:
git commit -a -m "Make ponies pink."
git push
shipit